Fiat-Währungen
Kryptowährungen
How to Add Cronos to MetaMask?
MetaMask is a popular browser extension and mobile app that allows users to interact with various blockchain networks and decentralized applications (DApps). One of the networks that MetaMask supports is Cronos, a layer 1 blockchain that enables interoperability between Cosmos and Ethereum ecosystems. Cronos uses the same native token as Crypto.org Chain, which is CRO.
If you want to use CRO or access any of the DApps built on Cronos, you need to add the network to your MetaMask wallet. In this article, we will show you how to do that in a few simple steps.
What is Cronos?
Cronos is a permissionless and scalable blockchain that aims to bring DeFi and NFT innovations to the masses. It is powered by Ethermint, a framework that allows Ethereum-compatible smart contracts to run on Cosmos-based chains. This means that Cronos can leverage the benefits of both Cosmos and Ethereum, such as fast finality, low fees, cross-chain communication, and a rich developer community.
Cronos also integrates with Crypto.org Chain, a fully decentralized and open-source network that supports payments, DeFi and NFT use cases. Crypto.org Chain has its own native token, CRO, which is also used as the gas fee and staking reward on Cronos. Users can easily transfer CRO between the two chains via an inter-blockchain communication (IBC) protocol.
Why Add Cronos to MetaMask?
MetaMask is one of the most widely used wallets for accessing Ethereum and other compatible networks. By adding Cronos to MetaMask, you can enjoy the following benefits:
- You can use the same wallet address and private key across multiple networks, which simplifies your asset management and reduces the risk of losing funds.
- You can access a variety of DApps built on Cronos, such as DeFi protocols, NFT marketplaces, gaming platforms, and more.
- You can take advantage of the low gas fees and high performance of Cronos, which improves your user experience and saves you money.
- You can easily switch between Cronos and other networks on MetaMask, which gives you more flexibility and convenience.
How to Add Cronos to MetaMask?
Adding Cronos to your MetaMask wallet has three ways: using the CoinCarp EVM Chain List, the official website, or manually entering the network details. We will explain these methods below.
Method 1: Using the CoinCarp EVM Chain List
This is the easiest and fastest way to add Cronos to your MetaMask wallet. All you need to do is follow these steps:
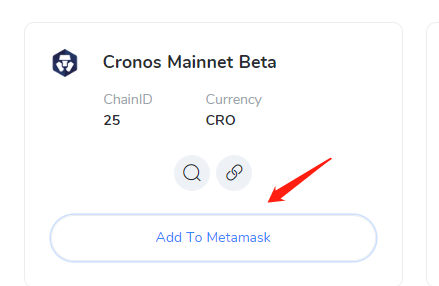
- Go to the CoinCarp EVM Chain List, locate the "Cronos Mainnet Beta" and click "Connect wallet". After connecting your MetaMask successfully, click "Add To Metamask".
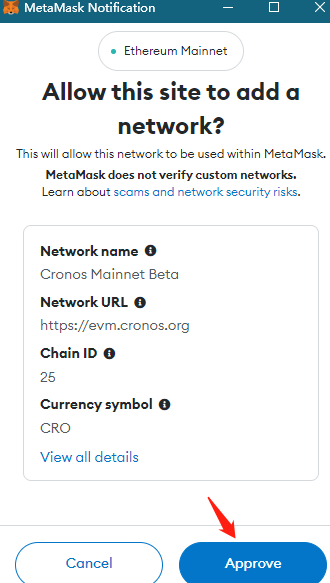
- Click Approve to confirm the addition of the network. You will see a confirmation message saying that Cronos has been added to your MetaMask wallet.
- Click Close to exit the Notifications tab. You can now see Cronos as one of the available networks on your MetaMask wallet. You can switch between networks by clicking on the network name at the top of the wallet interface.


Method 2: Using the Official Website
This is the general way to add Cronos to your MetaMask wallet. Here are the steps for this method:
- Go to the [Cronos website](https://cronos.crypto.org/) and click the MetaMask Add Cronos icon at the top right side of the screen. This will open up a MetaMask Notifications tab asking your permission to add a Cronos network to your MetaMask account. This Notification tab also contains the network details, though you won’t need to use them at any point in this method.
- Click Approve to confirm the addition of the network. You will see a confirmation message saying that Cronos has been added to your MetaMask wallet.
- Click Close to exit the Notifications tab. You can now see Cronos as one of the available networks on your MetaMask wallet. You can switch between networks by clicking on the network name at the top of the wallet interface.
Method 3: Manually Entering the Network Details
This method requires you to enter some information about the Cronos network into your MetaMask wallet settings. You can find this information from various sources, but it’s best to use the official documentation of Cronos. Here are the steps for this method:
- Open your MetaMask wallet and click on the Settings icon in the top-right corner.
- Select Networks from the menu on the left side of the screen.
- Click Add Network at the bottom of the list of networks.
- Enter the following information into the corresponding fields:
- Network Name: Cronos
- New RPCURL: https://evm.cronos.org
- Chain ID: 25
- Symbol: CRO
- Block ExplorerURL: https://cronoscan.com/
Click Save to add the network to your MetaMask wallet. You will see a confirmation message saying that Cronos has been added to your MetaMask wallet. Click Close to exit the Settings tab. You can now see Cronos as one of the available networks on your MetaMask wallet. You can switch between networks by clicking on the network name at the top of the wallet interface.
How to Use Cronos on MetaMask
Once you have added Cronos to your MetaMask wallet, you can start using it for various purposes. Here are some examples:
- You can send and receive CRO tokens between your MetaMask wallet and other wallets or exchanges that support Cronos.
- You can connect your MetaMask wallet to any DApps built on Cronos and interact with them using CRO tokens as gas fees or payments.
- You can explore some of the DApps built on Cronos.
Conclusion
Adding Cronos to your MetaMask wallet is a simple process that allows you to access a new world of possibilities on this innovative blockchain network. Whether you want to use CRO tokens for payments, DeFi, NFTs, or gaming, you can do it all with ease and convenience using your MetaMask wallet.
Stay tuned to CoinCarp Social Media and Discuss with Us:
- 9 Costly Mistakes Crypto Holders Make (And How to Avoid Them) Anfänger Apr 29, 2025 3m
- Axiym Reaches $132 Million in Volume, Streamlining Global Payments via Avalanche Anfänger Apr 24, 2025 2m
- NodeHaus Debuts as Real-Time RPC Monitoring Tool for Blockchain Foundations Anfänger Apr 24, 2025 2m
- Hermetica Launches 2.0 Update, Boosting Bitcoin-Backed Stablecoin Transparency and Usability Anfänger Apr 23, 2025 2m